Quick Intro to Behat
Welcome to Behat! Behat is a tool that makes behavior driven development (BDD) possible. With BDD, you write human-readable stories that describe the behavior of your application. These stories can then be auto-tested against your application. And yes, it’s as cool as it sounds!
For example, imagine you’ve been hired to build the famous ls UNIX command. A stakeholder may say to you:
Feature: ls
  In order to see the directory structure
  As a UNIX user
  I need to be able to list the current directory's contents

  Scenario: List 2 files in a directory
    Given I am in a directory "test"
    And I have a file named "foo"
    And I have a file named "bar"
    When I run "ls"
    Then I should get:
      """
      bar
      foo
      """
In this tutorial, we’ll show you how Behat can execute this simple story as a test that verifies that the ls commands works as described.
That’s it! Behat can be used to test anything, including web-related behavior via the Mink library.
Note
If you want to learn more about the philosophy of testing the “behavior” of your application, see What’s in a Story?
Note
Behat was inspired by Ruby’s Cucumber project.
Installation
Behat is an executable that you’ll run from the command line to execute your stories as tests. Before you begin, ensure that you have at least PHP 5.3.1 installed.
Method #1 (Composer)
The simplest way to install Behat is through Composer.
Create composer.json file in the project root:
{
    "require-dev": {
        "behat/behat": "~2.5"
    },
    "config": {
        "bin-dir": "bin/"
    }
}
Then download composer.phar and run install command:
$ curl -sS https://getcomposer.org/installer | php
$ php composer.phar install
Note
Composer uses GitHub zipball service by default and this service is known for outages from time to time. If you get
The ... file could not be downloaded (HTTP/1.1 502 Bad Gateway)
during installation, just use --prefer-source option:
$ php composer.phar install --prefer-source
After that, you will be able to run Behat with:
$ bin/behat
Method #2 (PHAR)
Download the PHAR corresponding to the latest 2.5 release on the Github release page.
Now you can execute Behat by simply running phar archive through php:
$ php behat.phar
Method #3 (Git)
You can also clone the project with Git by running:
$ git clone git://github.com/Behat/Behat.git && cd Behat
Then download composer.phar and run install command:
$ wget -nc https://getcomposer.org/composer.phar
$ php composer.phar install
After that, you will be able to run Behat with:
$ bin/behat
Basic Usage
In this example, we’ll rewind several decades and pretend we’re building the original UNIX ls command. Create a new directory and setup behat inside that directory:
$ mkdir ls_project
$ cd ls_project
$ behat --init
The behat --init will create a features/ directory with some basic things to get your started.
Define your Feature
Everything in Behat always starts with a feature that you want to describe and then implement. In this example, the feature will be the ls command, which can be thought of as one feature of the whole UNIX system. Since the feature is the ls command, start by creating a features/ls.feature file:
# features/ls.feature
Feature: ls
  In order to see the directory structure
  As a UNIX user
  I need to be able to list the current directory's contents
Every feature starts with this same format: a line naming the feature, followed by three lines that describe the benefit, the role and the feature itself. And while this section is required, its contents aren’t actually important to Behat or your eventual test. This section is important, however, so that each feature is described consistently and is readable by other people.
Define a Scenario
Next, add the following scenario to the end of the features/ls.feature file:
Scenario: List 2 files in a directory
  Given I am in a directory "test"
  And I have a file named "foo"
  And I have a file named "bar"
  When I run "ls"
  Then I should get:
    """
    bar
    foo
    """
Tip
The special """ syntax seen on the last few lines is just a special syntax for defining steps on multiple lines. Don’t worry about it too much for now.
Each feature is defined by one or more “scenarios”, which explain how that feature should act under different conditions. This is the part that will be transformed into a test. Each scenario always follows the same basic format:
Scenario: Some description of the scenario
  Given [some context]
  When [some event]
  Then [outcome]
Each part of the scenario - the context, the event, and the outcome - can be extended by adding the And or But keyword:
Scenario: Some description of the scenario
  Given [some context]
    And [more context]
   When [some event]
    And [second event occurs]
   Then [outcome]
    And [another outcome]
    But [another outcome]
There’s no actual difference between Then, And, But or any of the other words that start each line. These keywords are all made available so that your scenarios are natural and readable.
Executing Behat
You’ve now defined the feature and one scenario for that feature. You’re ready to see Behat in action! Try executing Behat from inside your ls_project directory:
$ behat
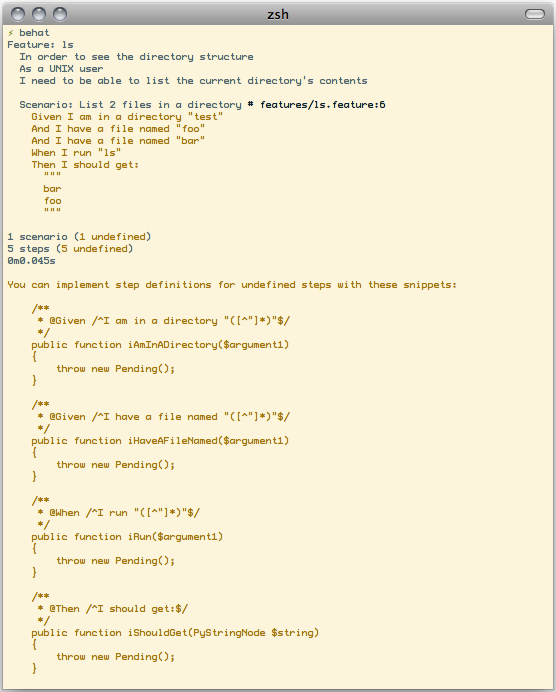
If everything worked correctly, you should see something like this:
Writing your Step definitions
Behat automatically finds the features/ls.feature file and tries to execute its Scenario as a test. However, we haven’t told Behat what to do with statements like Given I am in a directory "test", which causes an error. Behat works by matching each statement of a Scenario to a list of regular expression “steps” that you define. In other words, it’s your job to tell Behat what to do when it sees Given I am in a directory "test". Fortunately, Behat helps you out by printing the regular expression that you probably need in order to create that step definition:
You can implement step definitions for undefined steps with these snippets:

    /**
     * @Given /^I am in a directory "([^"]*)"$/
     */
    public function iAmInADirectory($argument1)
    {
        throw new PendingException();
    }
Let’s use Behat’s advice and add the following to the features/bootstrap/FeatureContext.php file, renaming $argument1 to $dir, simply for clarity:
# features/bootstrap/FeatureContext.php
<?php

use Behat\Behat\Context\BehatContext,
    Behat\Behat\Exception\PendingException;
use Behat\Gherkin\Node\PyStringNode,
    Behat\Gherkin\Node\TableNode;

class FeatureContext extends BehatContext
{
    /**
     * @Given /^I am in a directory "([^"]*)"$/
     */
    public function iAmInADirectory($dir)
    {
        if (!file_exists($dir)) {
            mkdir($dir);
        }
        chdir($dir);
    }
}
Basically, we’ve started with the regular expression suggested by Behat, which makes the value inside the quotations (e.g. “test”) available as the $dir variable. Inside the method, we simple create the directory and move into it.
Repeat this for the other three missing steps so that your FeatureContext.php file looks like this:
# features/bootstrap/FeatureContext.php
<?php

use Behat\Behat\Context\BehatContext,
    Behat\Behat\Exception\PendingException;
use Behat\Gherkin\Node\PyStringNode,
    Behat\Gherkin\Node\TableNode;

class FeatureContext extends BehatContext
{
    private $output;

    /** @Given /^I am in a directory "([^"]*)"$/ */
    public function iAmInADirectory($dir)
    {
        if (!file_exists($dir)) {
            mkdir($dir);
        }
        chdir($dir);
    }

    /** @Given /^I have a file named "([^"]*)"$/ */
    public function iHaveAFileNamed($file)
    {
        touch($file);
    }

    /** @When /^I run "([^"]*)"$/ */
    public function iRun($command)
    {
        exec($command, $output);
        $this->output = trim(implode("\n", $output));
    }

    /** @Then /^I should get:$/ */
    public function iShouldGet(PyStringNode $string)
    {
        if ((string) $string !== $this->output) {
            throw new Exception(
                "Actual output is:\n" . $this->output
            );
        }
    }
}
Note
When you specify multi-line step arguments - like we did using the triple quotation syntax (""") in the above scenario, the value passed into the step function (e.g. $string) is actually an object, which can be converted into a string using (string) $string or $string->getRaw().
Great! Now that you’ve defined all of your steps, run Behat again:
$ behat
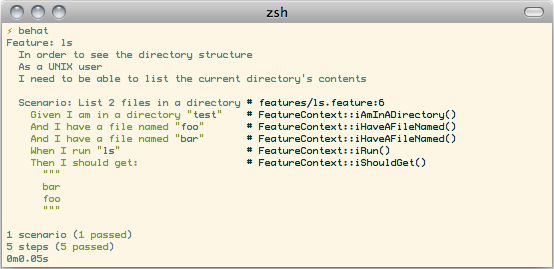
Success! Behat executed each of your steps - creating a new directory with two files and running the ls command - and compared the result to the expected result.
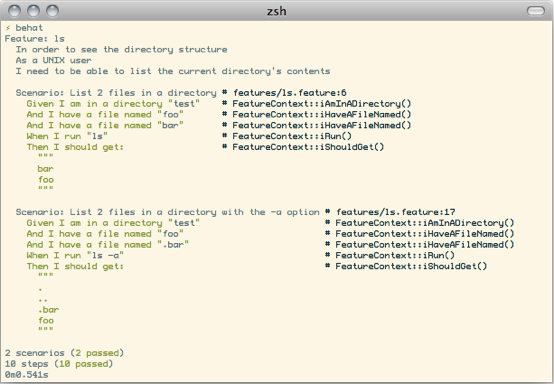
Of course, now that you’ve defined your basic steps, adding more scenarios is easy. For example, add the following to your features/ls.feature file so that you now have two scenarios defined:
Scenario: List 2 files in a directory with the -a option
  Given I am in a directory "test"
  And I have a file named "foo"
  And I have a file named ".bar"
  When I run "ls -a"
  Then I should get:
    """
    .
    ..
    .bar
    foo
    """
Run Behat again. This time, it’ll run two tests, and both will pass.
That’s it! Now that you’ve got a few steps defined, you can probably dream up lots of different scenarios to write for the ls command. Of course, this same basic idea could be used to test web applications, and Behat integrates beautifully with a library called Mink to do just that.
Of course, there’s still lot’s more to learn, including more about the Gherkin syntax (the language used in the ls.feature file).
Some more Behat Basics
When you run behat --init, it sets up a directory that looks like this:
|-- features
   `-- bootstrap
       `-- FeatureContext.php
Everything related to Behat will live inside the features directory, which is composed of three basic areas:
- features/ - Behat looks for *.feature files here to execute
- features/bootstrap/ - Every *.php file in that directory will be autoloaded by Behat before any actual steps are executed
- features/bootstrap/FeatureContext.php - This file is the context class in which every scenario step will be executed
More about Features
As you’ve already seen, a feature is a simple, readable plain text file, in a format called Gherkin. Each feature file follows a few basic rules:
- Every *.feature file conventionally consists of a single “feature” (like the ls command or user registration).
- A line starting with the keyword Feature: followed by its title and three indented lines defines the start of a new feature.
- A feature usually contains a list of scenarios. You can write whatever you want up until the first scenario: this text will become the feature description.
- Each scenario starts with the Scenario: keyword followed by a short description of the scenario. Under each scenario is a list of steps, which must start with one of the following keywords: Given, When, Then, But or And. Behat treats each of these keywords the same, but you should use them as intended for consistent scenarios.
Tip
Behat also allows you to write your features in your native language. In other words, instead of writing Feature, Scenario or Given, you can use your native language by configuring Behat to use one of its many supported languages.
To check if your language is supported and to see the available keywords, run:
$ behat --story-syntax --lang YOUR_LANG
Supported languages include (but are not limited to) fr, es, it and, of course, the english pirate dialect en-pirate.
Keep in mind, that any language, different from en should be explicitly marked with # language: ... comment at the beginning of your *.feature file:
# language: fr
Fonctionnalité: ...
  ...
You can read more about features and Gherkin language in “Writing Features - Gherkin Language” guide.
More about Steps
For each step (e.g. Given I am in a directory "test"), Behat will look for a matching step definition by matching the text of the step against the regular expressions defined by each step definition.
A step definition is written in php and consists of a keyword, a regular expression, and a callback. For example:
/**
 * @Given /^I am in a directory "([^"]*)"$/
 */
public function iAmInADirectory($dir)
{
    if (!file_exists($dir)) {
        mkdir($dir);
    }
    chdir($dir);
}
A few pointers:
@Given is a definition keyword. There are 3 supported keywords in annotations: @Given/@When/@Then. These three definition keywords are actually equivalent, but all three are available so that your step definition remains readable.
The text after the keyword is the regular expression (e.g. /^I am in a directory "([^"]*)"$/).
All search patterns in the regular expression (e.g. ([^"]*)) will become method arguments ($dir).
If, inside a step, you need to tell Behat that some sort of “failure” has occurred, you should throw an exception:
/**
 * @Then /^I should get:$/
 */
public function iShouldGet(PyStringNode $string)
{
    if ((string) $string !== $this->output) {
        throw new Exception(
            "Actual output is:\n" . $this->output
        );
    }
}
Tip
Behat doesn’t come with its own assertion tool, but you can use any proper assertion tool out there. Proper assertion tool is a library, which assertions throw exceptions on fail. For example, if you’re familiar with PHPUnit, you can use its assertions in Behat:
# features/bootstrap/FeatureContext.php
<?php

use Behat\Behat\Context\BehatContext;
use Behat\Gherkin\Node\PyStringNode;

require_once 'PHPUnit/Autoload.php';
require_once 'PHPUnit/Framework/Assert/Functions.php';

class FeatureContext extends BehatContext
{
    /**
     * @Then /^I should get:$/
     */
    public function iShouldGet(PyStringNode $string)
    {
        assertEquals($string->getRaw(), $this->output);
    }
}
In the same way, any step that does not throw an exception will be seen by Behat as “passing”.
You can read more about step definitions in “Defining Reusable Actions - Step Definitions” guide.
The Context Class: FeatureContext
Behat creates a context object for each scenario and executes all scenario steps inside that same object. In other words, if you want to share variables between steps, you can easily do that by setting property values on the context object itself (which was shown in the previous example).
You can read more about FeatureContext in “Testing Features - FeatureContext Class” guide.
The behat Command Line Tool
Behat comes with a powerful console utility responsible for executing the Behat tests. The utility comes with a wide array of options.
To see options and usage for the utility, run:
$ behat -h
One of the handiest things it does is to show you all of the step definitions that you have configured in your system. This is an easy way to recall exactly how a step you defined earlier is worded:
$ behat -dl
You can read more about Behat CLI in “Command Line Tool - behat” guide.